Vertical Storage Ideas: How to Use Your Kitchen Walls Look better.

Maximizing kitchen storage is one of the biggest challenges in modern homes. Vertical storage solutions transform walls into functional spaces, keeping countertops clear and making cooking more efficient. For homeowners with small kitchens or busy families, utilizing every inch of vertical space is essential.

This guide from Kitchen Fixit explores the best vertical storage ideas, helping you organize your kitchen like a professional chef while maintaining style and accessibility.


Why Vertical Storage Matters in the Kitchen

Kitchens often run out of space due to bulky appliances, cookware, and pantry items. Vertical storage:

  • Frees up countertop space for prep work
  • Increases accessibility to pots, pans, and ingredients
  • Creates a visually organized and clean kitchen
  • Works in small, galley, or L-shaped kitchens

Pro tip: Combining vertical storage with pull-out cabinets and drawer organizers maximizes every inch.


Top Vertical Storage Ideas for Your Kitchen

1. Floor-to-Ceiling Cabinets

  • Install tall cabinets that reach the ceiling to store rarely used items
  • Use the top shelves for seasonal cookware or bulk pantry items
  • Consider soft-close doors and pull-down racks for accessibility

Check our Kitchen Fixit cabinet installation services to get professional help with tall cabinets.


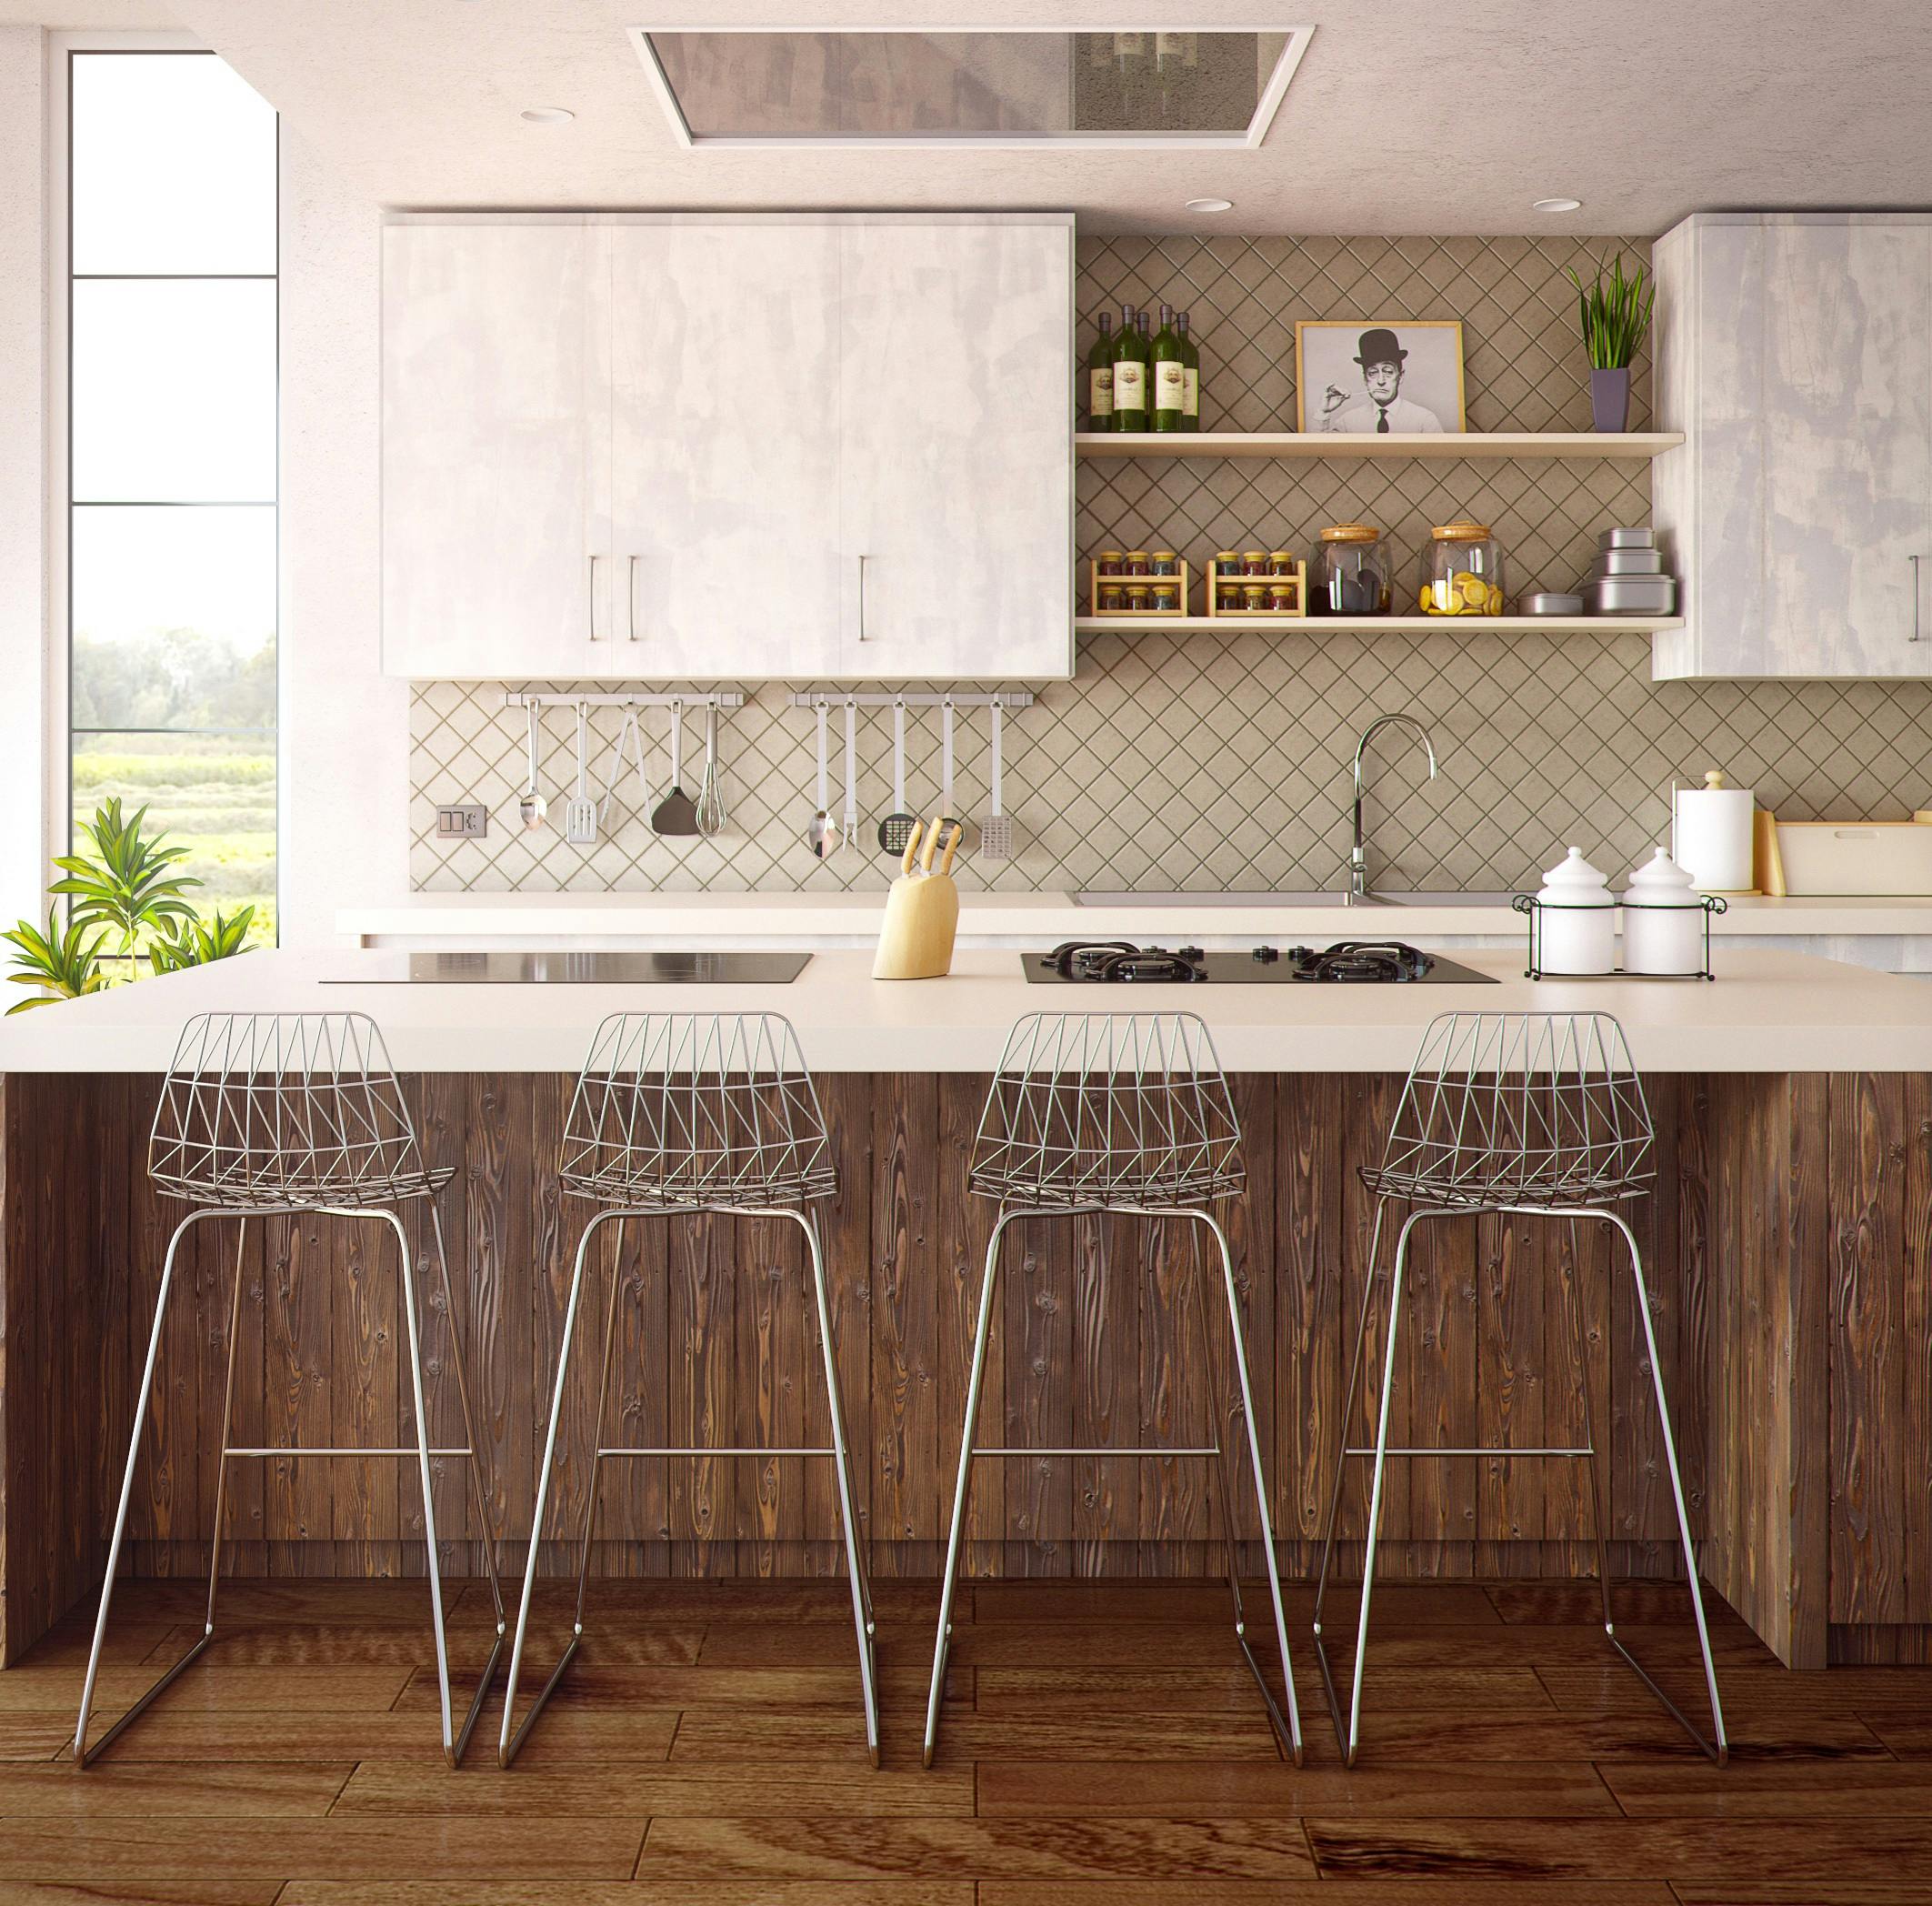
2. Wall-Mounted Shelves

  • Open shelves display dishes, glasses, and cookbooks
  • Adjustable brackets allow customization for different heights
  • Combine with baskets or containers to keep items neat

Pro tip: Use lightweight items on higher shelves to avoid accidents.


3. Magnetic Knife Strips and Tool Racks

  • Mount knives, spatulas, and other metal utensils on magnetic strips
  • Saves drawer space and keeps tools visible and accessible
  • Ideal for frequent cooking zones near prep counters

4. Hanging Pot Racks

  • Ceiling or wall-mounted racks store pots and pans
  • Keeps cookware within easy reach
  • Adds a professional kitchen look without cluttering cabinets

Visit our Kitchen Fixit remodeling services for expert installation of wall-mounted racks.


5. Pegboards for Custom Organization

  • Pegboards allow hooks, baskets, and shelves to be rearranged
  • Perfect for storing small appliances, utensils, and cutting boards
  • Highly customizable for your kitchen workflow

6. Under-Cabinet Storage

  • Utilize the space beneath upper cabinets for:
    • Wine glasses
    • Spice racks
    • Small hooks for mugs or utensils

Tip: LED under-cabinet lighting improves visibility and enhances aesthetics.


7. Pull-Out Wall Cabinets

  • Slim, vertical cabinets with sliding shelves make use of narrow spaces
  • Perfect for storing spices, oils, or canned goods
  • Keeps items organized and easy to access without taking floor space

8. Creative Wall Hooks and Rails

  • Install rails to hang cutting boards, oven mitts, or dish towels
  • Combine with baskets for added storage
  • Great for small kitchens where counter space is premium

Frequently Asked Questions (FAQs)

1. Can vertical storage work in small kitchens?
Absolutely. Wall-mounted shelves, hooks, and magnetic strips maximize space without crowding countertops.

2. Are wall-mounted racks safe for heavy cookware?
Yes, as long as racks are anchored into studs or reinforced walls. Professional installation is recommended.

3. How do I make vertical storage look stylish?
Use uniform baskets, color-coordinated containers, and clean lines. Open shelving combined with decorative items creates a polished look.

4. Can vertical storage improve kitchen workflow?
Yes. By keeping frequently used items within reach, cooking becomes faster and more organized.


Final Thoughts

Using your kitchen walls for vertical storage is an easy way to expand space, improve workflow, and maintain a clean aesthetic. From floor-to-ceiling cabinets to pegboards and magnetic racks, every wall can become functional.

For custom vertical storage solutions, professional installation, and kitchen remodeling, Kitchen Fixit is ready to help you transform your kitchen into a space that is both efficient and stylish.

Induction and Gas: The benifits and difficulties of Switching During Your Remodel.

This guide from Kitchen Fixit breaks down the pros and cons of induction and gas cooking, helping you make an informed decision during your remodel.

Choosing the right cooking surface is one of the most important decisions when remodeling a kitchen. Between induction cooktops and gas stoves, homeowners face a balance between performance, convenience, safety, and long-term costs. Each option has unique benefits and potential drawbacks, making it essential to understand which choice aligns best with your cooking style and household needs.

Understanding Induction and Gas Cooking

Induction cooking uses electromagnetic energy to directly heat pots and pans, while the cooktop itself remains relatively cool. This method is highly efficient, offering precise temperature control and faster cooking times.

Gas cooking, on the other hand, uses an open flame to heat cookware. It has long been favored by professional chefs and home cooks for its visual cues, responsive heat control, and compatibility with all types of pots and pans.


Pros of Induction Cooking

  1. Energy Efficiency
    Induction cooktops convert nearly 90% of energy into heat, reducing electricity waste compared to gas stoves.
  2. Safety
    The cooktop stays cool, minimizing burn risks. Auto-shutoff features on modern induction cooktops add an extra layer of safety.
  3. Precision and Speed
    Induction heats faster and allows for precise temperature adjustments, making delicate cooking tasks easier.
  4. Easy Cleaning
    Because spills do not burn onto the cooktop, cleaning is simple and fast.
  5. Modern Design
    Induction cooktops offer a sleek, minimalist look that complements contemporary kitchens.

Cons of Induction Cooking

  1. Cookware Compatibility
    Only magnetic cookware, such as stainless steel or cast iron, works on induction surfaces.
  2. Higher Upfront Cost
    Induction cooktops are generally more expensive than gas ranges.
  3. Learning Curve
    Some cooks find induction responsive heat takes practice to master compared to gas flames.

Pros of Gas Cooking

  1. Instant Heat Control
    Gas stoves offer real-time visual feedback, allowing immediate temperature adjustments.
  2. Universal Cookware
    All types of cookware—including copper, aluminum, and ceramic—are compatible with gas flames.
  3. Traditional Cooking Experience
    Many chefs prefer gas for its versatility in sautéing, searing, and wok cooking.
  4. Continued Operation During Power Outages
    Gas stoves can function without electricity, which is useful in areas prone to outages.

Cons of Gas Cooking

  1. Lower Energy Efficiency
    Gas stoves convert only 40–55% of energy into heat, making them less efficient than induction.
  2. Safety Risks
    Open flames increase the risk of burns or accidental fires. Gas leaks are a potential hazard and require proper ventilation.
  3. Maintenance
    Gas burners require regular cleaning to prevent clogs and uneven heating.
  4. Installation Limitations
    Gas lines may need professional installation, adding to remodeling costs.

Factors to Consider When Choosing

When deciding between induction and gas during a remodel, consider:

  • Cooking Habits: Do you value precision and speed or traditional flame control?
  • Budget: Factor in both installation and long-term energy costs.
  • Kitchen Layout: Ensure electrical capacity for induction or gas line access.
  • Safety Needs: Induction is safer for households with children.
  • Aesthetic Preferences: Modern kitchens often pair well with induction cooktops.

Final Thoughts

Switching cooking surfaces during a remodel is a major decision that affects performance, energy use, safety, and design. Induction offers efficiency, safety, and speed, while gas provides universal cookware compatibility, visual control, and traditional cooking experience. Understanding your household needs and cooking style is crucial before committing to either option.

For expert guidance on kitchen appliance selection, installation, or remodeling, Kitchen Fixit can help ensure your kitchen is functional, safe, and stylish.

A Step-by-Step Kitchen Remodeling Checklist: From Demolition to Decor.

A kitchen remodel is one of the most rewarding home improvement projects, but it can also be overwhelming without a clear plan. From tearing out old cabinets to adding the final decorative touches, each phase requires careful coordination. A structured checklist helps you stay on schedule, manage costs, and avoid costly mistakes.

This comprehensive guide by Kitchen Fixit provides a step-by-step kitchen remodeling checklist to help you move confidently from demolition to décor while ensuring quality and efficiency at every stage.

Step 1: Define Your Remodeling Goals

Before any physical work begins, clearly define what you want to achieve with your kitchen remodel. Are you aiming for better functionality, modern aesthetics, increased storage, or higher resale value?

Key considerations include:

Budget limits and financing

Kitchen size and layout changes

Style preferences (modern, traditional, minimalist)

Long-term needs of your household

Setting clear goals ensures that all decisions align with your vision and budget.

Step 2: Create a Realistic Budget and Timeline

A successful kitchen remodel depends on accurate budgeting and scheduling. Account for materials, labor, permits, and a contingency fund for unexpected expenses.

Important budgeting tips:

Allocate funds for essential upgrades first

Include 10–15% buffer for surprises

Plan a realistic timeline to avoid rushed decisions

Proper planning prevents delays and overspending.

Step 3: Design and Layout Planning

Kitchen design directly impacts usability and workflow. Focus on creating an efficient layout that supports cooking, cleaning, and storage.

Design essentials:

Optimize the kitchen work triangle (sink, stove, refrigerator)

Choose cabinet configurations for maximum storage

Plan lighting and electrical outlets early

Professional design input can help you avoid layout issues later.

Step 4: Obtain Permits and Hire Professionals

Many kitchen remodels require permits for electrical, plumbing, or structural changes. Hiring licensed professionals ensures compliance with local building codes and safety standards.

Benefits of professional contractors:

Proper permitting and inspections

Skilled workmanship

Reduced risk of costly rework

Kitchen Fixit recommends working with experienced professionals for complex remodeling projects.

Step 5: Demolition and Site Preparation

Once planning and permits are complete, demolition begins. This phase involves removing old cabinets, countertops, appliances, and flooring.

Preparation tips:

Protect surrounding areas from dust

Turn off utilities when necessary

Dispose of debris safely

Proper site preparation sets the foundation for smooth installation.

Step 6: Plumbing, Electrical, and Structural Work

After demolition, essential infrastructure work begins. This includes updating plumbing lines, electrical wiring, and any structural modifications.

Key tasks include:

Installing new wiring and outlets

Upgrading plumbing fixtures

Reinforcing walls or floors if needed

Completing this phase correctly is critical for safety and performance.

Step 7: Install Cabinets and Countertops

Cabinet installation defines your kitchen’s structure and storage. Precision is essential to ensure proper alignment and functionality.

Installation considerations:

Level cabinets for long-term durability

Choose countertops based on durability and style

Seal surfaces to prevent moisture damage

Quality installation improves both appearance and lifespan.

Step 8: Flooring, Backsplash, and Painting

With major fixtures in place, it’s time to complete surface finishes. Flooring, backsplashes, and paint add personality and cohesion to your kitchen.

Best practices:

Select slip-resistant, durable flooring

Use easy-to-clean backsplash materials

Apply moisture-resistant paint

These elements enhance both function and aesthetics.

Step 9: Appliance Installation and Lighting

Installing appliances and lighting brings your kitchen to life. Ensure appliances are energy-efficient and compatible with your layout.

Key points:

Properly connect gas and electrical appliances

Install task and ambient lighting

Test all fixtures before finalizing

This stage improves usability and energy efficiency.

Step 10: Final Touches and Decor

The final phase focuses on décor and personalization. Small details make a big impact on the finished look.

Decor ideas include:

Cabinet hardware upgrades

Window treatments

Decorative lighting and accessories

Thoughtful décor completes the transformation.

Step 11: Final Inspection and Cleanup

Before using your new kitchen, conduct a thorough inspection. Check for any installation issues, leaks, or electrical problems.

Final steps:

Test appliances and fixtures

Address punch-list items

Perform deep cleaning

A proper inspection ensures everything meets your expectations.

Final Thoughts

A kitchen remodel is a complex process, but following a clear step-by-step checklist makes it manageable and rewarding. From demolition to décor, careful planning and execution are the keys to success.

For expert remodeling support, repairs, or professional guidance, Kitchen Fixit is your trusted partner in creating a kitchen that combines functionality, style, and durability.

Smart Kitchen Technology: Must-Have Gadgets That Make Cooking Easier.

Smart kitchen technology is transforming how homeowners cook, clean, and manage their kitchens. From saving time on daily tasks to improving energy efficiency and safety, smart gadgets are no longer a luxury—they are becoming a practical necessity. Whether you are renovating your kitchen or simply upgrading appliances, integrating smart technology can significantly improve convenience and performance.

In this guide by Kitchen Fixit, we explore the must-have smart kitchen gadgets that make cooking easier, more efficient, and more enjoyable.


What Is Smart Kitchen Technology?

Smart kitchen technology refers to appliances and devices that use connectivity, automation, and sensors to simplify kitchen tasks. These gadgets often connect to Wi-Fi or Bluetooth and can be controlled through mobile apps or voice assistants such as Alexa or Google Assistant.

Smart kitchens are designed to:

  • Reduce manual effort
  • Improve cooking accuracy
  • Enhance safety and hygiene
  • Save time and energy

With the right tools, even complex cooking tasks become manageable for busy households.


Smart Refrigerators for Better Food Management

Smart refrigerators are one of the most impactful kitchen upgrades. These appliances come equipped with internal cameras, touchscreens, and temperature sensors that help you track food items and reduce waste.

Key benefits include:

  • Viewing fridge contents remotely through a mobile app
  • Receiving expiration date reminders
  • Energy-efficient temperature control
  • Built-in recipe suggestions

By minimizing food spoilage and unnecessary grocery purchases, smart refrigerators help maintain an organized and efficient kitchen.


Smart Ovens and Ranges for Precision Cooking

Smart ovens and ranges take guesswork out of cooking. They allow precise temperature control and remote operation, ensuring consistent results every time.

Features commonly include:

  • Preheating from a smartphone
  • Automatic cooking presets
  • Internal temperature probes
  • Voice command integration

These appliances are ideal for busy homeowners who want reliable results without constant monitoring.


Intelligent Cooktops and Smart Sensors

Induction cooktops with smart sensors offer faster heating and better safety. Many models automatically adjust heat levels based on cookware size and cooking needs.

Advantages include:

  • Faster cooking times
  • Reduced energy consumption
  • Automatic shut-off for safety
  • Even heat distribution

Smart cooktops are particularly beneficial for families looking to improve both efficiency and kitchen safety.


Smart Dishwashers That Save Time and Water

Modern smart dishwashers are designed to optimize water usage while delivering superior cleaning performance. They can detect load size and adjust cycles automatically.

Notable features:

  • Remote start and monitoring
  • Leak detection alerts
  • Energy and water usage tracking
  • Quiet operation modes

These dishwashers are ideal for households aiming to reduce utility costs without compromising cleanliness.


Voice-Controlled Kitchen Assistants

Voice assistants play a central role in smart kitchens. They help manage tasks hands-free while cooking or cleaning.

Common uses include:

  • Setting cooking timers
  • Converting measurements
  • Creating shopping lists
  • Controlling other smart appliances

Voice-controlled assistants improve workflow and reduce interruptions during meal preparation.


Smart Coffee Makers and Small Appliances

Small appliances are also getting smarter. Smart coffee makers, blenders, and kettles allow customization and scheduling through mobile apps.

Benefits include:

  • Scheduled brewing times
  • Personalized settings
  • Consistent results
  • Reduced manual operation

These gadgets enhance daily routines and add convenience to busy mornings.


Smart Lighting for Better Visibility and Ambiance

Lighting plays a crucial role in kitchen functionality. Smart lighting systems allow you to adjust brightness and color temperature depending on the task.

Advantages:

  • Improved visibility for food prep
  • Energy-efficient LED control
  • Motion-activated lighting
  • Mood lighting for dining

Smart lighting enhances both functionality and aesthetics.


Smart Kitchen Safety Devices

Safety is a major advantage of smart kitchen technology. Devices such as smart smoke detectors, gas leak sensors, and water leak monitors help prevent accidents.

Key benefits:

  • Instant alerts on mobile devices
  • Automatic shut-off features
  • Enhanced peace of mind

These tools are especially valuable for families and rental properties.


How to Choose the Right Smart Kitchen Gadgets

Before investing in smart kitchen technology, consider:

  • Compatibility with existing appliances
  • Ease of use and setup
  • Long-term maintenance requirements
  • Budget and energy efficiency

Not every gadget is necessary for every home. Focus on tools that match your cooking habits and lifestyle.


Installation and Maintenance Considerations

Proper installation is essential to ensure optimal performance and safety. Smart appliances often require:

  • Stable Wi-Fi connectivity
  • Professional electrical or plumbing setup
  • Regular software updates

Kitchen Fixit recommends professional installation and routine maintenance to extend the lifespan of smart kitchen devices.


Final Thoughts

Smart kitchen technology is redefining modern cooking by combining convenience, efficiency, and innovation. From smart refrigerators to voice-controlled assistants, these gadgets simplify everyday tasks and improve overall kitchen performance. Investing in the right smart tools not only makes cooking easier but also adds long-term value to your home.

For expert guidance, installation, or kitchen upgrades, trust Kitchen Fixit to help you build a smarter, more efficient kitchen.